The Rewards of Growing Your Veggies

Posted on by

With the last of the late spring frost warnings behind us (finger’s crossed), now is a great time to talk about the rewards of growing your own tomatoes and veggies as a part of your garden.

The most obvious reason to grow your own food is taste. Yes, you can find lots of produce in your local grocery store, but nothing will thrill your taste buds quite like what you produce in your own garden. Remember, it takes a long time for tomatoes and veggies to be harvested, shipped and distributed – plus you don’t know how long they’ve been on the shelf by the time you buy them. The food you grow, however, has a very short journey to make from garden to kitchen and that freshness makes it more delicious and nutritious.

When you cultivate your own food, you also have more control of what goes in and on your food. Typically, you don’t know what commercial growers are using. You can go all-organic, but you’ll pay a premium for it. You, on the other hand, determine what goes into your garden soil to amend it and what types of treatments you use to deal with bugs or other plant issues.

You’ll also avoid other uncertainties about the food you eat. It’s not so long ago that we had romaine lettuce recalls because of e-coli outbreaks. That’s something you don’t have to worry about with your homegrown veggies.

Then there’s the benefits that extend to all sorts of gardening, whether it’s flowers or food. Time out in the sunshine gives you vitamin D. You increase your physical activity doing something you love. There’s also a lot of evidence that microorganisms in the soil (specifically Mycobacterium vaccae) triggers the release of serotonin in our brains, which is yet another reason why gardening can make you happy.

If you have small children, make sure they are a part of cultivating your tomato and veggie garden. First of all, it’s a great family activity, plus it will teach them loads about everything from biology to having a little patience. As a bonus, it’s more likely your kids will eat their vegetables if they help you grow them, according to a study by Ohio State and Cornell universities.

If you have any questions about growing tomatoes or vegetables (or anything else in your garden), please stop by the nursery and ask. We’d love to help you cultivate a terrific garden that’s full of good eats.

Happy gardening,
Misti
Warm Season Veggies

Posted on by

By definition, warm season vegetables are the ones that really can’t stand the cold – things like tomatoes and eggplants and melons. Because they are so susceptible to cool temperatures, they are typically planted outdoors only after the last frost of the spring.

Which is a problem here in northern Arizona. By the time we have the last frost of spring here, it’s practically summer. 

Don’t let the lovely temperatures of the last few days fool you. We can get a frosty night right up until June 15, and that’s way too late to get your plants in the ground and have them mature. We need to start them now!

Fortunately, there are ways to get your delicious warm season veggies planted and still protect them from late season frosts.

First off, let’s talk about where you are planting them. We like the idea of putting your veggie plants in raised garden beds or containers where you can ensure they are in nutrient-rich soil.

Once they are planted, it’s time to invest in some season extenders.

The most popular ones are tubes of water that go around the plant. They absorb heat during the day and keep you plant toasty at night. Additionally, they warm up the soil under your plant, which promotes good root growth and lessens the chance of shock, which will make your plant stronger.

You can also go the DIY route with PVC pipe and thick plastic. Just assemble the pipe into a frame that can cover your plants and attach the plastic to it. Pull it over your veggie beds at night and just make sure to take it off during the daytime.  

Growing warm weather vegetables in our region can be a bit of a challenge, but let’s face it – when you bite into that yummy pepper or cucumber or tomato, you’ll know that all your  hard work was worth it.

Happy Gardening!
Misti

Houseplant of the Week: The Black Raven ZZ Plant

Posted on by

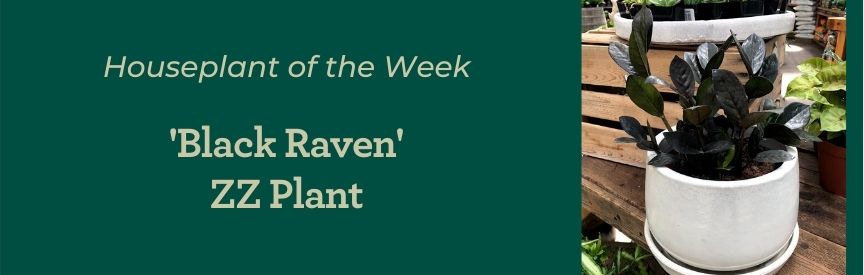
We love the Zamioculcas zamiifolia (say that three times fast), better known as the ZZ, and right now we have one of the rarer versions of this plant – the Black Raven, with glossy black leaves.

Despite it’s exotic looks, the Raven is a relatively easy plant to take care of.

This is one of the most forgiving plants you’ll find in our nursery. Miss a watering (or three) and it still shows off it’s glossy, feathery wings as its rhizomes hold a lot of water. It’s not particular about soil; anything that drains well will do.

It’s not even fussy about light, which makes it very popular in places where there’s little natural light, like an office cubicle, or cities where most days are overcast. (Although truthfully it thrives best in bright indirect light.)

It also has no identified pest or disease problems.

No wonder this beauty is the star of so many Instagram posts!

Outdoor Décor Ideas

Posted on by


I was reading recently that the #1 hot trend in home improvement this year was “more outdoor living.”

Now some of this was about how to make the outdoors more of a feature even when we are inside – like adding a sunroom or bigger windows so you can see your outdoor space more.

But much of this movement is about looking outward and making our patios and back yards feel like another room in our homes.

Décor is a big part of this trend, and I wanted to spend a little time talking about how you can bring your unique style into your outdoor spaces.

Since Warner’s is a nursery, let’s start with some living things that will brighten up your outdoor space.

First off, plant containers. We have the best selection of outdoor pottery in the region and we are huge fans of container gardening. Whether it’s a hanging basket spilling over with flowers or gorgeously glazed pots on the ground, this is a portable garden that you can place almost anywhere. Plus it doesn’t require that you have a huge backyard – a tiny patio can be transformed into a lush, colorful oasis with a few potted plants.

But annual and perennial flowers aren’t your only source of living décor. Vines are also beautiful additions to your outdoor space. We particularly like having them woven through a pergola for additional shade outside on the patio. Warner’s will be getting in its stock of vines in late May.

Of course, one of the things about our homes is that they give us a little privacy and you don’t have to sacrifice that in your outdoor space. Hedges are great for creating that feeling of seclusion and peace. There’s a lot of great ones to choose from, including forsythia, privet, juniper, serviceberry and Sumac varieties.

Now to think about some non-living decorations for your outdoor space. You’ll need to think about your style here and what kind of look you are going for. Rustic or contemporary? Formal or casual? Bright colors or muted shades? 

Fortunately, you don’t need to buy a whole new patio set to update your look. It can be as simple as changing out the cushions on your lawnchairs or adding a little something that brightens your space up.

Here’s some ideas:

  • Birdbaths – there’s a huge variety available, from ornate to simple, and they are always an elegant addition to your yard. Plus, the birds will really appreciate it!
  • Fountains – Nothing like the sound of running water to make your space feel more peaceful and serene.
  • Windchimes – Another example of a piece of décor that can be a delight to both your eyes and your ears.
  • Decorative yard stakes. We have a great selection of these at Warner’s and they can be beautiful or surreal or funny – or all of the above.

Whatever your taste, we hope that you have fun decorating your outdoor space this season – and take time to enjoy it once you get it all decked out.

Happy Gardening!
Misti

Houseplant of the Week: Ric Rac Cactus

Posted on by
Ric Rac cactus

In the rainf‌orest, the Ric Rac Cactus lives on tree trunks as an epiphyte, its dramatic serrated leaves cascading down. But much like bromeliads, orchids and air plants that hail from the tropics, it’s possible to successfully cultivate a Ric Rac Cactus in your home.

The name comes from the zig zag decorative trim that you often see on curtains and clothing. In fact one of the other popular names for this plant is the “zig zag cactus” and also the “fishbone cactus.”

Because its distinctive leaves cascade beautifully, this plant looks fabulous in a hanging basket. 

Caring for your Ric Rac Cactus
Your Ric Rac needs porous soil. Warner’s has a mix designated for cacti that you can purchase, or make your own with a mix of three parts potting soil to one part pumice.

This cactus loves a warm spot, but protect it from direct sun rays which can burn the beautiful leaves. 

Because it is a tropical plant, the Ric Rac likes a little more humidity than your typical cactus. It should grow in average household conditions. It can tolerate drought, but to keep your Ric Rac in tip top shape, make sure it gets a drink when the top inch of soil dries out.

Give it some food once a week during the spring and summer growing months and then cut back during the winter. A liquid fertilizer similar to one for orchids works well. 

If the leaves get very long, you might want to give your Ric Rac a trim, but be careful! This is a cactus and it has some small (but sharp) thorns.

Pruning for Garden Health

Posted on by


As our gardens start to shape up with new flowers and seedlings, one important step people sometimes skip is pruning their trees and shrubs.

Part of this is a philosophy that says “if it’s not broke, don’t fix it.” Why bother to prune if there’s no immediate problem, like your tree is about to head into some powerlines or your shrubs have taken over a walkway. (There are several good reasons, which I share below).

The other problem is that many people don’t feel confident in their pruning techniques. If that’s the case, keep reading for some basics and tips that will help.

First of all, why prune? Most important are those safety reasons – removing dead or cracked branches that are threatening to fall or making sure living ones aren’t growing into areas where you don’t want them. But pruning also helps maintain the health of your tree or shrub and increases the yield of flowers or fruit. Why? Because proper pruning will shape the tree to allow for optimum growth. 

Early spring is the perfect time for pruning because most plants are just starting to wake up and run sap, which means they’ll be photosynthesizing, which will allow them the energy to recover from the pruning cut. For deciduous plants, there’s the added benefit that it’s easier to see what you are doing because the trees are bare. However, if you have a spring blooming tree or shrub, you should wait to prune until after it is done flowering. 

One important rule of all types of pruning is this: never prune more than one third of the plant. Prune more than that and you run the risk of damaging the plant, or at least stunting its growth. 

Types of Pruning Cuts for Deciduous Plants

Because many kinds of pruning cuts are made near a growth bud, you have to know how your plants grow in order to determine where to cut. There are three types: (1) a terminal bud grows at the tip of a shoot; (2) a lateral bud grows alongside the shoot; and (3) a latent bud lies dormant beneath the bark. If a branch breaks or is cut off near it, it may develop into a new shoot.

Once you determine the type, you can choose one of these four pruning cuts to keep it healthy.

  • Thinning – This is when you remove an entire branch or stem, taking it back to its point of origin or to a juncture with another branch. These cuts eliminate competing or old stems, reduce overall size, and open up a plant’s structure.
  • Heading – Heading cuts remove just part of a stem or branch – not the whole thing. Such cuts can be made back to a bud or to a twig and it stimulates the growth of lateral buds just below the cut. 
  • Shearing – Clipping a plant’s outer foliage to create an even surface (like with hedges or a topiary). It’s kind of an indiscriminate form of heading, because it doesn’t involve precise cutting just above a growing point.
  • Pinching – This is the simplest of pruning cuts. Using your thumb and forefinger or a pair of hand shears, you nip off the tips of new growth, removing the terminal bud. This stops the shoot from growing longer and stimulates branching. Pinching is used primarily on annuals and perennials to make them bushy and encourage the production of more flowers.

What to Do with Conifers

Part of the allure of evergreens is that they are usually low-maintenance plants. A little periodic pruning, however, can keep your conifers healthy and looking their best. When thinking about pruning conifers – or any plant for that matter – it’s good to remember the old adage, “measure twice and cut once.” In the case of conifers, it’s “think twice and prune once.” 

Here’s the really important thing to remember: there is no place for “recreational pruning” of conifers because they don’t replace growth like other trees and shrubs; pruning is always done for a particular purpose, like keeping a particular look, removing dead or diseased branches or controlling the size if they are threatening to grow into other plants or buildings.

Have more questions about spring pruning? Visit or give us a call if you need some advice – we are always happy to help.

Happy Gardening!
Misti

Houseplant of the Week: Tradescantia

Posted on by

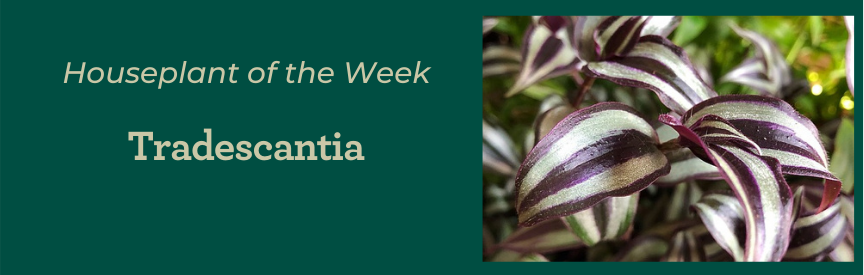
Tradescantia goes by many names, including wandering jew and the purple inch plant. Whatever you call it, however, it is a beauty that looks great in a hanging planter or spreading along a flat surface.

Part of the spiderwort family and originally from Mexico, Tradescantia is a plant that grows easily – some might argue too easily. In fact, in certain zones, it is grown outside and can be seen as invasive!

But as a indoor plant, it will be a welcome and colorful addition to any room.

Typically, Tradescantia matures into a plant about 6 to 9 inches in height spreading 12 to 24 inches.

Caring for Your Tradescantia

Probably the trickiest part of cultivating your Tradescantia is getting the moisture levels right. These plants like their water, but like most plants will develop root rot if they are soggy. Your best bet is to make sure that it is planted in potting soil that drains well. Mixing a little sand into your potting soil can help. Water them when the soil starts to get dry; don’t let the plant fully dry out.

You’ll also be looking to find the right balance for light. Tradescantia likes bright but indirect light. Too little light and the distinctive variegation on its leaves will start to fade. Too much direct sunlight and those leaves will scorch. However, they can tolerate some direct light, which makes them a great choice for growing in a sunny window.

Propagating Your Inch Plant

Remember how we said this plant was easy to grow? Well, that applies to creating new plants from cuttings. Simply take a one-inch piece of stem containing at least one leaf and set it in fresh potting soil. Water it regularly and you should have a fully rooted new plant in just a few weeks.

Bulbs, Bulbs, Bulbs

Posted on by

Typically, I write to you about bulbs during the fall to remind you to plant the ones that are coming up right now – things like tulips, crocus, daffodils and irises. It’s always heartbreaking when we get people in the nursery around this time of year looking for tulip bulbs and we have to break it to them that they missed getting them into the ground in time.

But getting your spring-blooming bulbs into the ground in time is only half the story. You also need to know how to maintain these plants once they’ve poked their pretty blossoms out of the soil.

Here are some tips:

  • You need to keep the soil moist but well drained. You don’t want to allow the bulb to dry out during this time as it will affect how long the blooms will last.
  • Once they are done blooming, it’s important NOT to cut back the unsightly foliage, because this is how the bulb stores energy in order to bloom next year. Instead, you can fold the foliage over and secure it with a rubber band to hide it.
  • Another way to make areas with spent bulbs look more attractive is to plant other perennials to hide the foliage. I love using pansies and violas, since they look beautiful paired with bulb flowers and both can take our current cold nights.

It’s also good to remember that spring bulbs aren’t the only ones around. There are summer blooming bulbs, like begonias, caladium, dahlias, gladiola, elephant ears and more. So you can still plant some spectacular looking bulbs this year, but understand the planting process will be a little different than for spring bulbs.

Right now, summer bulbs can be purchased, but other than edibles like onion, scallions and garlic, these summer-blooming bulbs are tropical. Unlike spring bulbs – which not only like, but need cold weather – these summer bulbs can’t take the cold. That means they shouldn’t be planted outside until the threat of frost is over – which, as we know, can be well into spring in Flagstaff.

We suggest planting in containers inside and moving them out towards the end of May. The general rule of thumb is, if it’s time for you tomatoes to go outside, it’s time to plant your summer bulbs.

And, unlike your spring bulbs, chances are you’ll need to plant new bulbs every spring for summer blooms.

Whether you are enjoying your bulbs in the spring or summer, they are a beautiful addition to any garden.

Happy Spring!
Misti

Houseplant of the Week: Arrowhead Plants

Posted on by

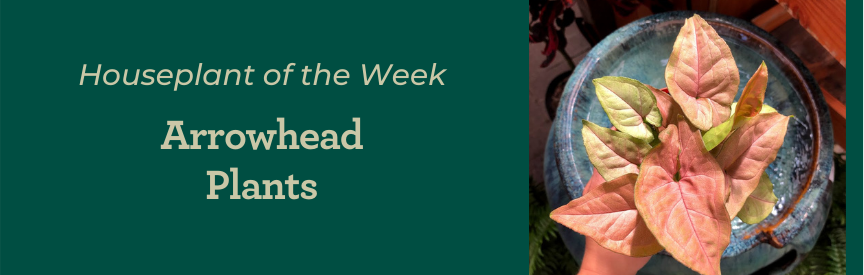
A hardy houseplant with uniquely shaped leaves, the Arrowhead plant is actually a vine, although you won’t see that early on since it grows very slowly. It works well as a hanging plant or in a standing pot and is also very easy to maintain.

Not only that, an established and healthy plant is easy to propagate with cuttings.

So what is the Arrowhead (also known as a Nyphthytis) looking for in its home?

  • Let your plant dry out between waterings. 
  • It likes a little humidity, particularly in the winter, so misting the plant daily or placing it on a pebble tray will help it thrive.
  • Make sure its soil drains well (if it’s too wet, it will lead to root rot).
  • Make sure your lighting is right. Arrowheads actually come in different shades and while green leaves will enjoy low or medium light, plants with pink or white leaves want bright, indirect light.
  • In either case do not place directly in the sun, which can bleach out the leaves.

Houseplant of the Week: The Croton

Posted on by

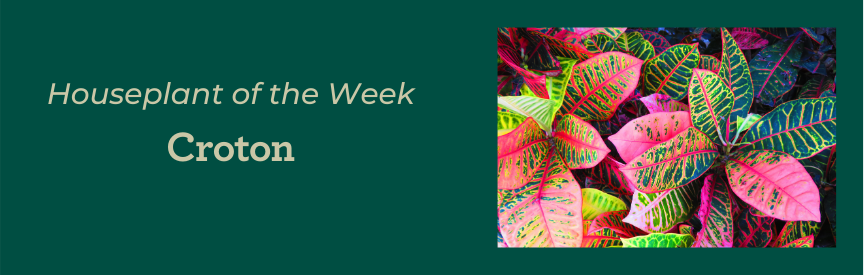
Variegated leaves in a strong greens, yellows, reds, orange, creams and pinks are the calling card of Codiaeum variegatum or the Croton plant. In more tropical areas, these beauties are grown outdoors, but they are also popular as lovely houseplants.

Here’s the first thing you need to know about these plants: They are finicky about being moved. So if you take home your plant and find that it loses a bunch of its leaves within a few days, don’t panic. It’s not that it’s a bad plant or you somehow “failed” it. Basically, it’s gone into shock. It will recover pretty quickly with some regular plant care – the right amount of light, proper watering and good soil.

Caring for your Croton

So let’s talk about lighting first. In general, Crotons like a sunny location; lack of sufficient light can even cause new leaves to be less colorful! But there’s a wide range of Crotons, so be sure to check the specific lighting needs of the variety you purchase.

Crotons also like their humidity; they are, after all, a tropical plant. A pebble tray or regular misting will keep your plant looking good.

Crotons should only be watered only when the top of the soil is dry to the touch. Then, they should be watered until the water flows out the bottom of the container. They like to dry out between waterings, so a soil with good drainage is a must.

The plant should also be kept away from drafts and cold, as it cannot tolerate temperatures below 60 degrees.